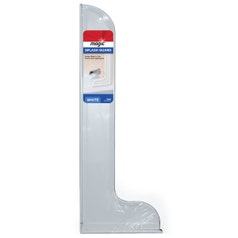
Splash Guard Kit
Prevent water from spilling out of your tub or shower with the easy-to-install Magic Splash Guard Kit. The kit includes two guards to cover both sides of your tub.


Magic Splash Guard Kit helps keep water in the tub and off of the bathroom floor, eliminating costly water damage and slippery areas. The accordion design, curtain clips, and industrial grade adhesive allow for a watertight seal on any tub. Fast & easy to install.
Additional Supplies Needed: Bathroom cleaner or scouring powder, scrubbing pad, rubbing (isopropyl) alcohol, paper towel or clean rags.
Follow directions carefully for proper adhesion. Use only per label directions.
Surface Preparation:
- Thoroughly clean tub & wall areas prior to application. Surfaces must be free of all soap film and residue. Wipe dry.
- As a final preparation, clean surfaces with rubbing alcohol to remove any remaining residue. Allow surfaces to dry completely before applying the splash guards.
Application:
- There is one left and one right-sided splash guard. To determine the proper placement, note that the curtain clip should only be visible from inside the tub. From outside the tub you should only see the smooth surface of the splash guard.
- If wall slants away from tub, place guard on flat surface and press on corrugation to expand the splash guard until it conforms to the wall angle. If wall slants towards the tub, compress guard to conform to the wall angle.
- Remove backing paper from adhesive. Press firmly into place making contact with wall and tub at the same time. Extreme irregularities in wall or tub may require caulk to fill gaps. Allow adhesive to set for at least one hour undisturbed before using tub.
- To secure shower curtain, hold the area of the curtain closest to the Splash Guard, and gently slide the curtain edge under the curtain clip on the inside of the guard.
How many splash guards are included in the kit?
Each kit contains two guards, one for each side of the tub.
What are the dimensions of the guard?
Length x Height x Depth (at the base): 5.5” x 7” x 1”
Suministros adicionales necesarios: Líquido limpiador o polvo limpiador para baño, almohadilla aplicadora, alcohol isopropílico, toallas de papel o un trapo limpio.
Instrucciones: Siga las instrucciones cuidadosamente para lograr una correcta adhesión. Utilizar siguiendo solamente las instrucciones de la etiqueta. Preparación de la superficie:
- Limpie completamente la bañera y el área de la pared antes de aplicar. Las superficies deben estar libres de jabón y residuos. Seque completamente.
- Como preparación final, limpie las superficies con alcohol isopropílico para eliminar restos de residuos. Las superficies deben estar completamente secas antes de aplicar la defensa antisalpicaduras.
Aplicación:
- Hay una defensa para el lado derecho y una para el lado izquierdo. Para determinar la colocación correcta, fíjese que el gancho de cortina debe estar visible solo desde el interior de la bañera. Desde el exterior de la bañera solo debería ver la superficie lisa de la defensa antisalpicaduras.
- Si la irregularidad de la pared se separa de la bañera, coloque la defensa sobre la superficie plana y presione la parte corrugada para expandir la defensa antisalpicaduras hasta que se adapte al ángulo de la pared. Si la irregularidad de la pared es hacia la bañera, comprima la defensa para que se adapte al ángulo de la pared.
- Quite el papel protector del adhesivo. Presione firmemente haciendo contacto con la pared y la bañera al mismo tiempo. Si las irregularidades en la pared o la bañera son significativas, use masilla para rellenar los espacios. Deje que el adhesivo se asiente durante una hora como mínimo, antes de usar la bañera.
- Para asegurar la cortina, acerque la cortina lo máximo posible a la defensa antisalpicaduras y suavemente deslice el borde de la cortina por debajo del clip de cortina, en el interior de la defensa.